
Custom Cleaning Brush
Horseshoe Composite Brush
Horseshoe/Frankfurt abrasive brush for marble, travertine, terrazzo and engineered stone with diamond or SiC fill from 24# to 3000# on a T105 base.
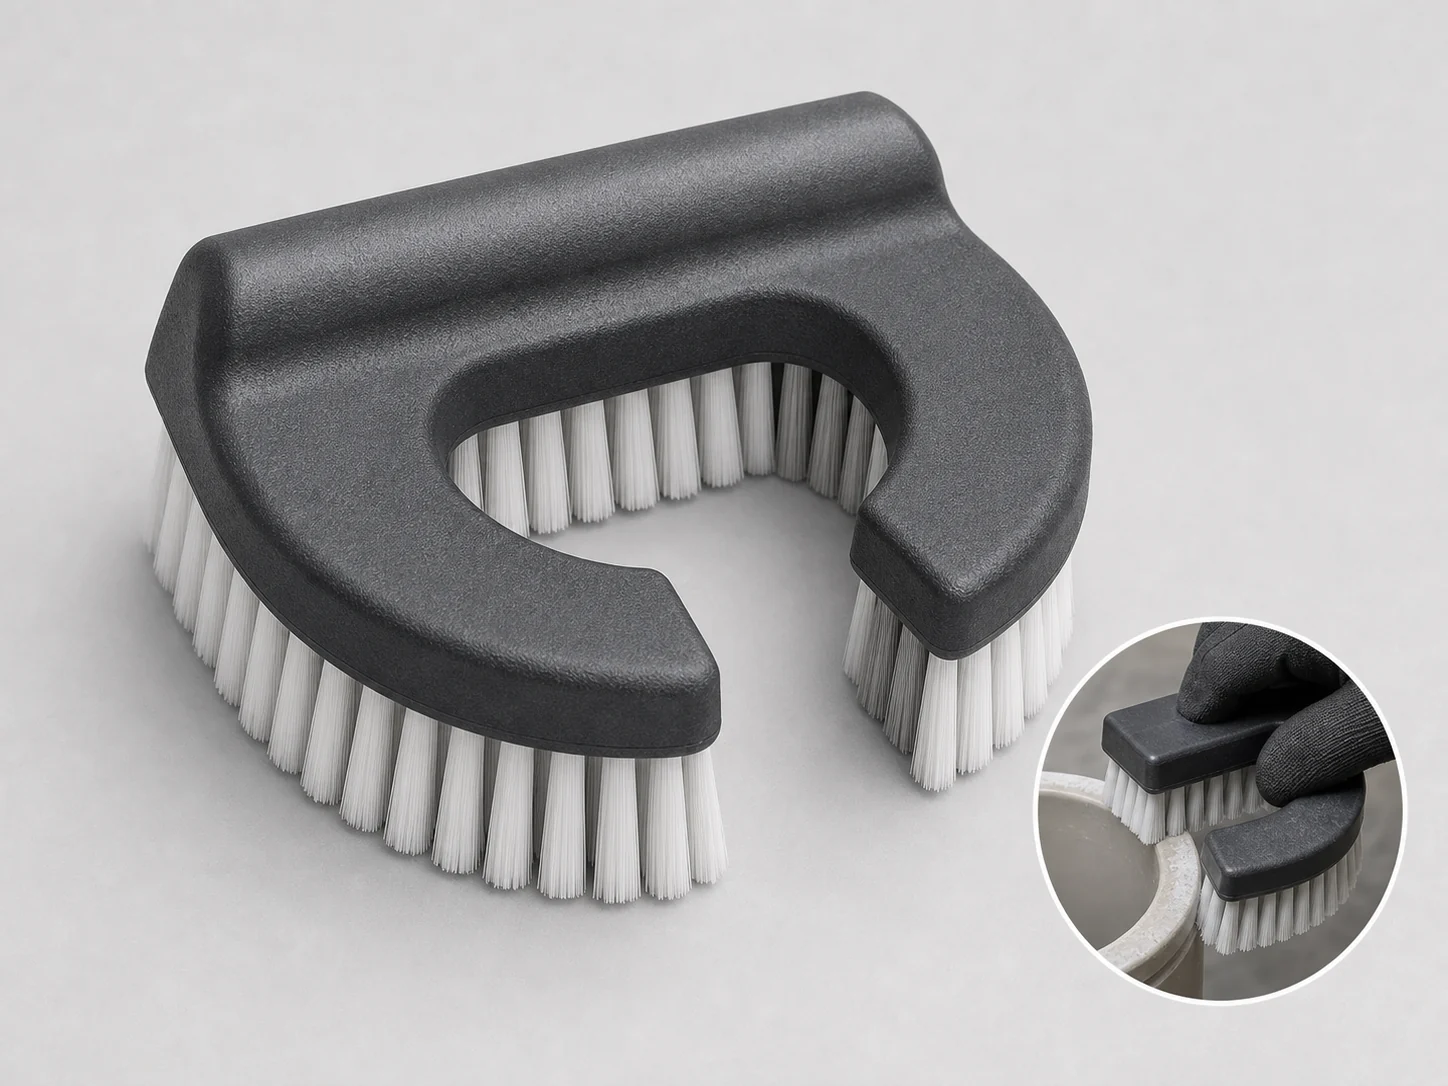
Medium brush
100 pcs
Minimum order
Worked with two hands or on a pole: chimney, gutter and pond-filter brushes, discs, cups and tank brushes.
Production lead time, once the specification is confirmed
- Up to 100 pcsWithin 7 days
- 101–5,000 pcsWithin 14 days
- 5,001–50,000 pcsWithin 21 days
- Over 50,000 pcsConfirmed with your quotation
Peak season can extend these times; the shipping date is confirmed in writing with your quotation. Sampling and shipping are quoted separately.
The Horseshoe Composite Brush is an abrasive stone-floor finishing brush that mounts into standard Frankfurt/T105 shoe plates and uses silicon-carbide or diamond-loaded composite filament to remove polishing residue, stubborn dust, and grinding haze while producing controlled honed, antique, or textured finishes on marble, travertine, terrazzo, and compatible natural or engineered stone. It is a finishing and surface-preparation tool, not a heavy stock-removal tool for leveling uneven floors.
What can this brush do for you?
Abrasive Contact That Follows the Stone Surface
The abrasive is carried inside a flexible nylon/composite filament matrix rather than on a rigid stone or metal block. The filaments deflect just enough to follow minor floor undulation while the exposed abrasive grain keeps cutting, so polishing residue, embedded dust, and grinding haze are removed without cutting new flatness errors into the stone.
Open Horseshoe Profile That Releases Slurry and Heat
The U-shaped base leaves a clear passage through the center of the working face. As the machine rotates, water and loosened residue flow out of the contact zone instead of packing into the fill. This keeps abrasive exposure and cutting action more consistent over long runs on marble, terrazzo, and limestone restorations.
Softer Contact Than Abrasive Bricks or Metal Tools
Composite filaments bend before they can gouge, which limits chipping at tile edges and grout lines and prevents the artificial-looking tracks that rigid tools can leave on softer stone. This control is especially useful for antique-texture and leather-finish work on travertine and limestone, where the objective is a controlled surface relief rather than rapid stock removal.
Wet-Operation Materials for Light-Colored Stone
The polypropylene base and synthetic composite fill are suited to wet and damp floor-machine work. They do not rust and do not shed metal particles onto light marble or engineered stone, avoiding the gray contamination and oxidation staining that can appear when steel-based tools are used in wet restoration work.
One Base Size, Full Sequence Coverage
Coarse silicon-carbide fills open the surface and create texture, while fine diamond fills refine the scratch pattern ahead of polishing powder or pads. Because every stage uses the same T105-style horseshoe mount, the machine plate and brush arrangement stay the same from initial residue removal through final pre-polish work.
What is a Horseshoe Composite Brush?
The Horseshoe Composite Brush is a rotary finishing tool for stone floor surfaces. Its U-shaped base is a molded block of impact-modified polypropylene with a T105/Frankfurt-style mounting interface that fits the shoe holders on single-head floor polishers and multi-head planetary grinders. The working face is filled with abrasive-loaded nylon or composite filament, with the silicon-carbide or diamond grain distributed through the filament instead of coated as a brittle surface layer.
In operation, the brush rotates with the machine plate while the operator moves the head across a damp stone surface. The abrasive grains cut and refine the stone, freeing polishing residue, dust, and embedded soil, while water carries the loosened material through the open horseshoe shape and away from the contact area. The brush is normally run as a sequenced set: coarse grits expose and texture the surface, intermediate grits remove the coarser scratch pattern, and fine grits produce the honed or pre-polish finish.
This tool belongs at the finishing end of a stone restoration process. It is not a replacement for metal-bond diamond grinding or fused abrasive stones when the floor needs lippage correction, deep scratch removal, or fast stock reduction. Its job is to clean, refine, and prepare an already-level floor without overcutting the surface.
Technical Specifications
The table shows the standard production configuration and the working range most stone-finishing projects are built around. Footprint, height, fill material, grit sequence, and the mount interface can all be adjusted when the machine plate or finish specification requires it.
| Parameter | Standard / Available Configuration |
|---|---|
| Brush form | Horseshoe / Frankfurt abrasive brush |
| Base reference | T105 horseshoe profile: 105 × 103 mm footprint, 85 mm reference height, 33 mm center opening; other base footprints available |
| Base material | Impact-modified polypropylene (PP) |
| Fill type | Silicon-carbide (SiC) or diamond abrasive in nylon/composite filament or strip |
| Grit range | 24#–3000#, selected by cleaning or finishing stage |
| Fill construction | Continuous strip or segmented tuft layout, matched to machine head and contact pattern |
| Mount interface | Standard Frankfurt/T105 shoe slot or clamp pattern; modified interface available for special plates |
| Operating condition | Wet or damp low-speed floor-machine operation; dry use only with appropriate grit and dust extraction |
| Typical substrates | Marble, travertine, terrazzo, limestone, and compatible natural or engineered stone surfaces |
| Brush type | Custom Polishing Buffing Wheels |
| How it is driven | Machine-driven, mounted in the equipment |
| Cleaning target | marble and travertine restoration, terrazzo and cement-based terrazzo maintenance, and textured stone finishing cleaning |
| Surface or part | stone, floors, composite, terrazzo, marble, travertine, compatible natural, and edges |
| Residue or debris | dust, polishing residue, haze, and powder |
| Mounting / connection | Standard Frankfurt/T105 shoe slot or clamp pattern; modified interface available for special plates |
Where does this brush work best?
The brush earns its place wherever a stone floor needs controlled surface refinement rather than material removal. Typical placements include:
- Marble and travertine restoration after diamond grinding: remove polishing residue, grinding haze, and embedded dust; produce an even honed finish or prepare the stone for polishing powder.
- Terrazzo and cement-based terrazzo maintenance: open soiled and wax-loaded surfaces, lift stubborn waste, and create a clean profile before sealing without acid etching or aggressive scraping.
- Antique, leathered, and textured stone finishing: coarse silicon-carbide fills create controlled relief on soft and medium stone; subsequent finer passes regulate final roughness.
- Limestone and soft stone honing: maintain flatness while removing dull surface film and shallow scuffing, with less edge chipping than rigid abrasives.
- Engineered stone and dense natural stone receiving a satin or pre-polish finish: refine transition scratches after metal-bond diamond work.
How do I choose the right one?
Let the stone set the abrasive choice
Soft and acid-sensitive stones such as travertine and limestone cut quickly, so a finer grit can still remove residue without over-texturing the surface. Dense terrazzo, engineered stone, or harder marble may need diamond abrasive at the same grit to keep the finishing sequence moving. Always start with a small test area if the stone type or previous finish is uncertain.
Choose the grit from the job, not from the label
Use 24#–150# when the floor needs opening, texturing, or removal of heavy residue and dull oxidized film. Use 200#–800# for haze removal and scratch refining after metal-bond grinding. Use 1000#–3000# for final honing and pre-polish work. Do not skip more than one step in the sequence if the previous scratch pattern is still visible under raking light.
Verify the base and machine plate before ordering
Measure the shoe slot or clamp opening on the machine plate and confirm the T105 footprint, height, and center opening against the brush drawing. For multi-head machines, order a complete set of brushes per head in each grit so all heads wear and cut at the same rate. A plate photo or dimension sketch is enough for our team to check fit.
Know when to use a different tool
| Floor condition or goal | Appropriate tool |
|---|---|
| Visible lippage, cupping, or gross unevenness | Metal-bond diamond grinding tools or fused abrasive stones |
| Grinding haze, polish residue, dust after leveling | Horseshoe Composite Brush, 200#–800# |
| Antique or leathered texture on soft stone | Horseshoe Composite Brush, 24#–150# SiC |
| Final honing or pre-polish refinement | Horseshoe Composite Brush, 800#–3000# diamond |
| Thick coatings, adhesive, heavy wax buildup | Mechanical coating removal or stripping tools before brushing |
If the floor requires significant material removal, run that step first. The brush is the bridge between grinding and polishing, not a substitute for either.
Can I customize this brush?
Every horseshoe composite brush can be configured to the floor machine, stone type, and finish sequence. To specify a build, provide the substrate, current floor condition, required finish, machine make and plate layout, number of heads, wet or dry operation, and the grit progression you intend to use. A sample piece or close-up photo of the current surface helps match the right abrasive.
- Base: footprint, height, center opening, clamping shape, reinforcement ribs, or an alternative polymer material for nonstandard holders.
- Fill: silicon-carbide or diamond abrasive, any grit step from 24# to 3000#, filament or strip construction, fill density, trim length, and stiffness.
- Sequence sets: matched grit progression sets for 3-head, 4-head, and 6-head machines, with grit color coding and identification labels.
- Color and marking: custom base color, molded or pad-printed identification, and sequence numbering.
- Packaging: bulk crates, per-machine sets, or staged finishing kits.
If the project requires material declarations, documented production inspection, or third-party testing and compliance support, those requirements can be handled within the customization scope.
Which filament belongs on a horseshoe composite brush, and how is that verified?
Can this brush remove deep scratches or level lippage?
No. The composite fill refines the existing surface and removes residue, dust, and transition scratches. Deep mechanical scratches and uneven tile edges should be corrected first with metal-bond diamond tools or fused abrasive stones. Using this brush before leveling will only polish the high points and make the unevenness easier to see.
Can I use it for routine maintenance on a polished stone floor?
Only if you intend to change the finish. The abrasive in the filament will reduce gloss on a polished floor. For routine maintenance of a polished surface, use a neutral cleaner and non-abrasive pads. This brush is the right choice when the floor is being honed, textured, or prepared for refinishing.
How do I know when to advance to the next grit?
Wash and dry a test section, then inspect it with a bright light held at a low angle. The scratch pattern should look uniform and match the current grit. If deeper random scratches from the previous stage are still visible, stay on the current grit until they disappear. Advancing too early leaves a finished surface built on an uneven scratch pattern.
How much water should I keep on the floor while brushing?
Keep the surface visibly wet with a thin, consistent film of water and remove excess slurry with a squeegee or extraction between long passes. Dry spots can overheat the filament and load the fill, while a deep puddle reduces contact pressure and slows the abrasive action.
What should I check before mounting a new brush?
Inspect the base for cracks or damage from shipping, check the mounting slot and center opening for wear or flash, and confirm every head in the gang has the same grit and same fill height. After use, rinse the fill with clean water to remove dried slurry and store the brushes flat rather than stacked under other tooling.
Guides that go deeper on this
Custom Manufacturing RFQ
Describe Your Application
Send the key measurements, cleaning requirement, residue, material direction, mounting method, quantity, and drawing or photo.
Drawing or photo optional — it speeds things up, it does not gate the enquiry.
Custom Brush RFQ
Send Your Brush Project
Upload a drawing, product photo, or sample photo and provide the core dimensions and cleaning conditions.
“We need a brush to remove wet residue from a stainless steel conveyor, about 800mm wide. The current brush wears quickly. We can send photos.”
“We sell drinkware and need a cleaning brush to include with the product. Quantity around 5,000 pieces.”