
What Is a Floor Burnisher Brush and How Does It Work?
A floor burnisher brush is a rotating abrasive or polishing tool that mounts to a high-speed floor machine (typically 1,500–3,000 RPM). Unlike scrub brushes that clean, a burnisher brush uses friction and speed to produce heat that momentarily softens floor finish or concrete surface, filling microscopic scratches and creating a high-gloss “wet look” or a polished sheen. The brush can have bristles made of natural fiber, synthetic material, or abrasive-impregnated filaments, and may be used dry or with a fine mist of water or polishing compound. The objective is to achieve the desired gloss level without burning the floor, melting the brush, or causing uneven wear.
Key Process Variables That Affect Brush Performance and Part Damage
The outcome of floor burnishing depends on five interconnected variables. Getting any one wrong can lead to poor results or damage.
| Variable | Role in Burnishing | Common Damage When Incorrect |
|---|---|---|
| Rotational Speed | Generates friction and heat for gloss transfer | Too high: burns finish, melts brush bristles, discolors floor. Too low: ineffective gloss, streaks. |
| Downward Pressure | Controls bristle contact area and load | Excessive: bristle splay, uneven wear, “digging” into soft finishes. Insufficient: gloss won’t develop. |
| Feed Rate (Travel Speed) | Determines dwell time per area | Too slow: overheating, burn marks. Too fast: skipped areas, poor gloss. |
| Contact Angle | Affects bristle deflection and pattern | Tilted too far forward/backward: edge damage, uneven brush wear, operator fatigue. |
| Wet vs. Dry Use | Lubrication, cooling, and compound delivery | Dry on sensitive floors: micro-scratches, dust. Over-wetting: slurry buildup, brush clogging. |
Other factors include floor composition (VCT, concrete, terrazzo), ambient temperature, and brush fill material. Even a small change in one variable often requires compensating adjustments in others.
Adjustment Methods for Common Floor Burnisher Brush Variables
Operators and facility managers typically adjust these variables using a combination of machine settings, pad drivers, and manual technique. The table below compares common adjustment methods.
| Adjustment Method | What It Controls | Pros | Cons |
|---|---|---|---|
| Machine Speed Control (variable or preset) | Rotational speed | Repeatable, reduces trial-and-error | Limited on single-speed machines; may not perfectly match floor condition |
| Handle Height & Angle Setting | Contact angle, pressure distribution | Low-cost, operator can adjust on the fly | Inconsistent between operators, may lead to uneven wear |
| Weight Kit or Added Mass | Downward pressure | Standardizes load across operators | Risk of over-pressuring if not matched to brush rating and floor |
| Brush Pad Driver (flexible, rigid, foam backing) | Pressure uniformity, shock absorption | Helps adapt brush to uneven floors, reduces “chatter” | Adds cost; wrong pad driver can soften brush action too much |
| Operator Pace Training | Feed rate | Low tech, promotes consistency | Still somewhat subjective; requires monitoring |
| Water/Compound Metering (spray bottle, pump-up sprayer) | Lubrication and cooling | Prevents dry burn, controls slurry | Over-application can fling residue, over-dilute compounds |
For critical floors, consider using a tachometer to verify actual brush RPM under load, a push-force gauge to quantify pressure, or a surface temperature gun to avoid overheating. These tools can turn guesswork into a repeatable recipe.
How to Run Controlled Trials Without Preset Parameter Limits
Because every floor and finish combination is different, there is no universal “correct” speed, pressure, or feed rate. Instead, design short, documented trials:
- Select a small, inconspicuous test area (e.g., 2 ft × 2 ft near a corner or under a furniture footprint).
- Choose one variable to vary while keeping others fixed. For instance, test three pressure levels using a weight kit or handle position while maintaining identical speed and feed rate.
- Record the machine setting, brush type, floor condition, and any compound used. Note the ambient temperature and humidity if working on reactive finishes.
- Evaluate each trial immediately after a single pass and after the floor has cooled or dried. Look for gloss uniformity, any sign of melting, stickiness, or micro-scratches under oblique lighting.
- Measure if possible: Use a gloss meter (e.g., 60° geometry) to get objective numbers. Even a simple smartphone photo under consistent lighting can serve as a visual record.
- Repeat the trial with the best setting, then vary another variable to fine-tune.
- Document the final “run card” for that floor zone: RPM (or machine setting dial), weight added, feed rate (in ft/sec or based on a metronome beats per 10 ft), angle handle notch, and wet/dry protocol.
This trial methodology gives you a process window without needing manufacturer presets that may not exist or apply to your specific job conditions.
Common Mistakes That Lead to Brush or Floor Damage
Avoid these frequent errors to keep brushes working effectively and floors unharmed:
- Using high-speed brush on a pressure-sensitive floor finish. Some finishes cannot handle the heat of 2000+ RPM burnishing. Test an invisible area first.
- Letting the brush sit stationary while spinning. This creates burn rings within seconds. Always keep the machine moving.
- Ignoring brush break-in. New brushes often have uneven tips; run them on a test floor section or against a sacrificial board to even the bristle ends before use on the show floor.
- Mismatching brush fill material to the application. For example, using an aggressive abrasive-impregnated brush on VCT that only requires light polishing can remove too much finish.
- Forgetting to clean the brush regularly. Built-up residue, melted plastic, or embedded grit will change performance and may scratch floors.
- Assuming same settings work across all floor areas. Floors near entrances, under tables, or in sun-drenched areas may require different treatment.
- Not adjusting for brush wear. As bristles shorten, pressure and heat generation change. Periodically re-check your process.
When a Floor Burnisher Brush Is Not the Right Tool
A floor burnisher brush shines by creating a high-gloss finish through frictional heat, but it is not a one-size-fits-all solution. Consider alternative approaches when:
- The floor has heavy soiling or deep scratches. Burnishing will not clean; it will only encapsulate dirt and scratches under the finish. Perform deep scrubbing or diamond grinding first.
- The floor finish is too old, brittle, or cracked. Burnishing a failing finish can cause peeling or make defects more visible. Strip and recoat before burnishing.
- You need aggressive coating removal. Brushes designed for burnishing are not intended for stripping. Use a stripping pad or dedicated abrasive brush instead.
- The floor material requires a different attack. Highly porous stone, unsealed wood, or delicate surfaces may not respond well to high-speed dry burnishing. A slower scrub-and-polish or wet pad method may be safer.
- Consistency between large shifts is critical. If manual technique variance is causing quality issues, consider an automated or ride-on burnisher with programmable parameters instead of relying solely on walk-behind brush adjustment.
Final Takeaway on Optimizing Floor Burnisher Brush Use
Effective floor burnisher brush optimization is about systematically balancing speed, pressure, feed rate, contact angle, and lubrication to match the specific floor, finish, and brush. The goal is a repeatable, damage-free gloss. Build your process knowledge through short, documented trials rather than guessing. Always check brush condition, clean regularly, and know when to switch to a different tool or method. By treating burnishing as a controllable process rather than a routine task, you extend brush life, protect floor investments, and achieve consistent, professional results.
Frequently Asked Questions
What is the best rotational speed for a floor burnisher brush?
There is no single “best” speed because it depends on the floor finish, brush material, and desired gloss. Standard high-speed burnishers run between 1,500 and 3,000 RPM. Start with the machine’s factory setting and run a test patch. If the finish appears melted, sticky, or discolored, the speed may be too high. If gloss doesn’t develop after a few passes, the speed may be too low.
Can I use a floor burnisher brush dry on any floor?
Not every floor tolerates dry burnishing. Some resilient floors (like older VCT) can burn or produce micro-scratches from dry heat. Always test on an inconspicuous area. Where dry burnishing is intended, use a brush designed for dry use, such as those with natural fiber or special heat-resistant synthetic bristles.
How do I know if I’m applying too much pressure?
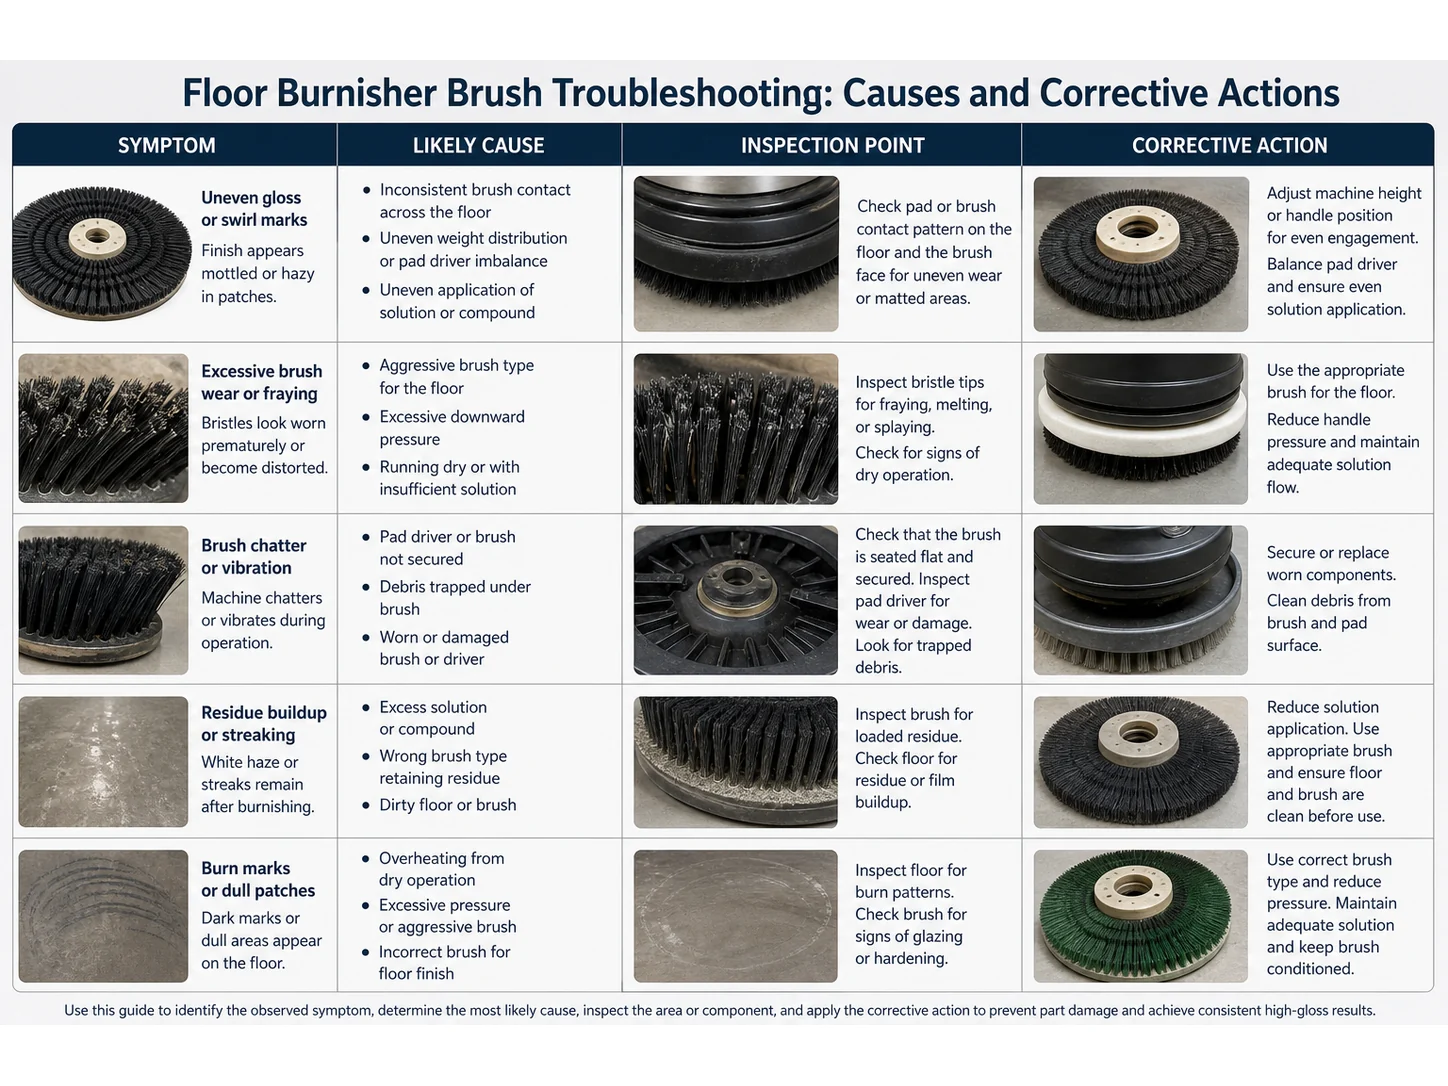
Signs of excessive pressure include: the brush bristles splay outward excessively, the machine struggles to maintain RPM (audibly bogging down), the floor finish develops a white “burn” mark, or the brush wears unevenly. If possible, use a push-force gauge or weight kit to standardize and compare results.
Why does my floor burnisher brush leave swirl marks?
Swirl marks often result from a dirty brush, embedded debris, or using a brush that is too aggressive for the finish. Clean the brush thoroughly, inspect for particles caught in the bristles, and match the brush fill material to the floor. Another cause can be an improper contact angle that causes the brush edge to dig in.
How often should I replace or resharp a floor burnisher brush?
There is no fixed interval. Replace or resharpen when bristle length shortens to the point where performance drops (gloss decreases, longer time needed), or when bristle tips become uneven and cannot be corrected. Tracking hours of use and inspecting frequent in high-traffic areas is a practical approach.
What is the difference between a burnisher brush and a scrub brush for floors?
A burnisher brush is designed for high-speed operation to create heat and gloss; it typically has finer bristles or abrasive-embedded filaments. A scrub brush is designed for lower-speed applications to agitate and remove soil, often with stiffer or wider bristles. Using a scrub brush on a burnisher can cause excessive friction and damage.
Can I use water or polishing compound with any floor burnisher brush?
Not all brushes are compatible with wet use. Some natural fiber brushes may degrade or become overly soft when wet. Synthetic brushes and those specifically labeled for wet or spray burnishing are safer.
Which nylon grade fits this job — Nylon PA, PA6 Nylon or PA66 Nylon?
| Grade | Continuous temperature (°C) | Peak temperature (°C) | Water absorption | Hardness |
|---|---|---|---|---|
| Nylon PA | 93 | 121 | 0.3–9% by PA grade and conditioning | Medium to firm; filament diameter and trim length control bending force. |
| PA6 Nylon | 80–100 | 130–160 | 1.5–3.0% | Shore D 75–85 |
| PA66 Nylon | 100–120 | 150–180 | 1.0–1.8% | Shore D 80–88 |
| PA610 Nylon | 90–110 | 130–150 | 0.5–1.0% | Shore D 72–82 |
| PA612 Nylon | 90–110 | 130–150 | 0.3–0.7% | Shore D 70–80 |
Figures as published by Brushtec / DuPont. Confirm the exact grade against the supplier datasheet before ordering.
When are Floor Scrubber Sweeper Brushes the wrong choice for floor burnisher brush?
- Floor Scrubber Sweeper Brushes — Use a pad, squeegee, vacuum, or pressure wash when the task is polishing, liquid recovery, or non-brush soil removal.
- Nylon PA — The nylon family spans several grades, so heat, moisture and chemical limits should follow the selected PA resin rather than a generic nylon value.
- PA612 Nylon — PA612 costs more than general PA6 and should be used where its wet stability, recovery or wear life creates a real process benefit.
What should replace Floor Scrubber Sweeper Brushes for floor burnisher brush?
- Floor Scrubber Sweeper Brushes — Floor scrubber and indoor sweeper brushes are selected around a scrub deck and controlled downforce; road-sweeper brooms are designed for outdoor debris pickup, gutter reach, impact, and dust-control systems. Closest alternative: Road Sweeper Brooms.
- Nylon PA — Compare Nylon PA with PP, PBT, PET. Change material when wet stiffness, temperature, chemical resistance, conductivity, particle shedding, or surface marking becomes the limiting factor.
- PA612 Nylon — Compare PA612 Nylon with PA66, PP, PBT. Change material when wet stiffness, temperature, chemical resistance, conductivity, particle shedding, or surface marking becomes the limiting factor.